AR15 TOOLS
Introduction
March 1, 2020 Update: This page is undergoing a massive and long overdue update. A lot has changed since this page was published in its original version back in April 2008.
There is no way around it; if you desire to service, maintain, and build AR 15’s, you will need some tools. Some of the tools required are standard hand tools that you may already own while other necessary tools are very specialized and designed for specific tasks. When working on an ar15, some tools turn a complicated operation into a simple task. Below we will look at these tools and give a brief description of their use and why I suggest it.
Basic & General Gunsmithing Tools
Basic Tools
- Safety Glasses
- Nylon & Brass Tip Hammer
- Ball Pein Hammer
- Punch Set
- Hex Key Wrench Set – Folding and individual
- Torque Wrench
- Strap Wrench
- Dental Tools – Tooth brushes and picking tools
- TAPE
- Lubricants
General Gunsmithing Tools
- Headspace Gauges –
- Grace Gunsmith Screwdriver Set –
- Brownells Magna-Tip Screw Driver Set –
- Crow Foot Wrenches –
AR 15 Specific Tools
AR 15 Upper Receiver Tools
- Odin Works Vise Block – An indispensable tool needed for the assembly of an AR 10 /15 upper. The ODIN Works Vise Block allows you to secure your upper receiver while you clean or install barrels, forends, muzzle devices, and any accessories you want to mount on your upper.
- DPMS Panther Claw AR-15 – The “Claw” is the perfect armorer tool for holding all AR Style upper receivers. Made of a solid one piece high strength polymer, the Claw is extremely durable. Simply clamp the Claw into a bench vise, slide the upper onto the Claw, secure with the two holding pins and begin installing your barrel and components.
- Geissele Reaction Rod for AR 15 Upper Receivers – The Geissele Reaction Rod is a tool that securely holds an upper receiver assembly for maintenance and assembly work. It will make working on an AR15 or M4 carbine a dream. The removal and installation of barrels, flash hiders, gas blocks and hand guards is made much easier and simpler. The Reaction Rod is designed to be gripped in a bench vise so that the rod is either horizontal or vertical. The upper receiver is then slid onto the rod and the rods integral splines enter the barrel extension and secure the barrel extension from turning. This allows all the torque from barrel nut wrenches to go directly into the barrel extension. In contrast, receiver vise blocks transmit the turning force into the aluminum receiver, a good part of which passes through the small, easily distorted receiver index pin. With the Geissele Reaction Rod, marring of an upper receivers finish by gripping and twisting inside vise blocks is eliminated and so is the need to remove sights and mounts from the receivers M1913 rail.
- Magpul Bev Block – The BEV Block (Barrel Extension Vise) is an all-in-one, compact vise block tool for AR15/M4 assembly operations of barrel nuts, flash hiders, etc. Mounts securely in a vise and provides support for both billet and forged upper receivers. Engages barrel extension with solid steel lugs and full length support shank to prevent flexing. Steel hardness is optimized for durability yet won’t damage barrel extension, and Magpul Polymer is used for all other engagement surfaces to protect aluminum receiver. O-ring post uses bolt carrier for additional stability and included Pin keeps upper in proper position.
The BEV can also be turned over and used as a mag well vise block to support the lower receiver during maintenance, etc. Provides support for all AR15/M4 upper and lower receivers, Solidly engages barrel extension with steel lugs Full-length steel support shank, Body made from the same high-quality polymer as other Magpul products
AR 15 Lower Receiver Tools
- Geissele Reaction Block – The Geissele Reaction Block is designed to aid in the assembly of lower receivers. Once the armorer has installed the buffer tube, the lower receiver can then be slid into the Reaction Block at the 12, 3, 6 and 9 o’clock positions. Allowing the armorer to rotate the lower in 90° increments in the block simply by loosening the provided nylon screws, removing the lower and sliding it back in at its desired orientation. The Reaction Block provides an ultra-stable platform for performing an array of lower receiver operations, as well as making the installation of the buffer retainer nut quick and easy. All while keeping both hands of the armorer free to work, saving both time and frustration.
- Lower Receiver Block –
- Pivot Pin Installation Tool –
- Barrel Tools –
- Buttock Installation Tools –
- Barrel Nut and Action Wrenches –
- Handguard Wrenches –
Bench Vise and Vise Accessories
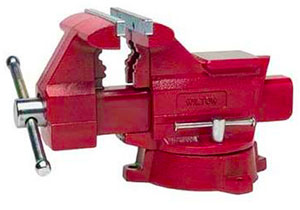
A BENCH VISE is a must when servicing, maintaining, and building an AR-15 RIFLE. The bench vise will serve as an extra set of hands while you wrestle with springs and roll pins. You are also much less likely to damage your AR15 while it’s secured in a bench vise.
Being an apartment dweller, I have to take an unconventional approach to work on my firearms. In the case of the bench vise, I don’t have a workbench, so I am either forced to bring my hardware to the day job or work from my coffee table. I prefer the coffee table. To that end, I purchased a 41-pound WILTON 11128 6-1/2-Inch STEEL UTILITY VISE (also known as Wilton part numbers 28820, 676U, 11128, 676) and mounted it to a homemade wooden platform. The platform is about two feet wide and eighteen inches deep and two inches thick. This platform is sized to fit precisely on its storage shelf. The bench vise is mounted to allow handle clearance when the vise is fully closed. When I get a chance, I will upload a picture.
Using the vise in this manner with this heavy BENCH VISE and platform allows me to perform any task except tightening a barrel nut. When tightening a barrel nut, I clamp the base to a table or equally substantial support. Alternatively, I stick a pipe in the lower vise jaws meant for a round object and apply force in the opposite direction as the barrel nut tightening operation. Both methods work well.
Vise Accessories
- Magnetic Soft Jaws –
- Barrel Vise Jaws –
AR 15 Punches
One of my pet peeves from folks who assemble their AR15 rifles is the sloppy installation of the various roll pins the AR 15 rifle requires. In all fairness, there are a few roll pins that present a challenge to the inexperienced and experienced alike. The BOLT CATCH ROLL PIN comes to mind as does the FORWARD ASSIST ROLL PIN. The BOLT CATCH ROLL PIN is positioned quite close to the body of the LOWER RECEIVER and requires a ROLL PIN PUNCH to have a flat side to install correctly.
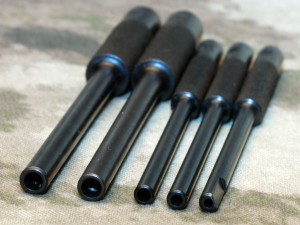
I have searched the internet shooting forums and websites as well as polled users of my forums for a better way to install roll pins. In that search, I found some creative approaches, but nothing that worked any better than my method of taping a ROLL PIN to a ROLL PIN PUNCH. Well, that was then this is now. Brownell offers a ROLL PIN STARTER SET they refer to as ROLL PIN HOLDERS. The pins are available individually or as a set for just under $50. I opted for the complete set.
BROWNELLS AR 15 ROLL PIN HOLDER OPERATION:
The roll pin holders are genius. As seen in the image above, the ROLL PIN HOLDERS are simply a punch that has a hollow tip the diameter of a given roll pin. Place the ROLL PIN in the correct ROLL PIN PUNCH HOLDER and with a plastic faced or brass hammer carefully tap in the ROLL PIN. To prevent damage to the WEAPON, stop hammering before the ROLL PIN HOLDER contacts the part that accepting the ROLL PIN. At that point, switch to a regular ROLL PIN PUNCH, the type with a half-round nose, and finish driving the ROLL PIN flush.
NOTES ON ROLL PIN HOLDER USE:
- Cover any part of your weapon with masking tape followed by a layer of duct tape in any area that could be damaged from ROLL PIN INSTALLATION. The duct tape serves as a great protector for your weapon. The underlying masking tape makes duct tape removal a simple process.
- Grease – I like to apply a small amount of grease in the ROLL PIN HOLE to help with proper installation. I also add a small amount of grease to the inside of the ROLL PIN HOLDER to help prevent the ROLL PIN from falling out and getting lost should I have a brain lapse.
- For finishing the BOLT CATCH ROLL PIN INSTALLATION I suggest the BOLT CATCH PIN PUNCH from Brownells. It is almost entirely flat on one side, making installing the BOLT CATCH ROLL PIN the rest of the way a breeze.


